
*** UPDATE 4/17/15: So it’s been over a year now that I’ve done this finish to the kitchen countertops. I wanted to let you guys know how it was holding up, and the answer is GREAT! There has been absolutely no chipping or peeling. The Envirotex coating is still rock solid! The only issue we’ve had with it is it can stain. This has happened when my kids have cut open a freezer pop and left the top little bit on the counter. Then it melts and the color stains the countertop (but just a little). I also did this to my kids’ bathroom and I found that some of the more brightly colored kids’ toothpastes stain the finish too. Again, it’s very faint, and natural granite has some discoloration to it anyway, so it’s not that noticeable. But, if you are on the OCD side and stains really upset you, you probably want to do this in darker colors than I chose.
*** UPDATE 2/4/14: I actually did this to my kitchen countertops over the weekend. I started making videos while I was doing it, and then halfway through I thought I was recording, got in the “zone” with painting, and then discovered I hadn’t been recording at all, and naturally I was finished with the painting. =( So, sadly, I don’t have a video, but I am going to do this again on my kids’ bathroom vanity, and hopefully the video will get made then.
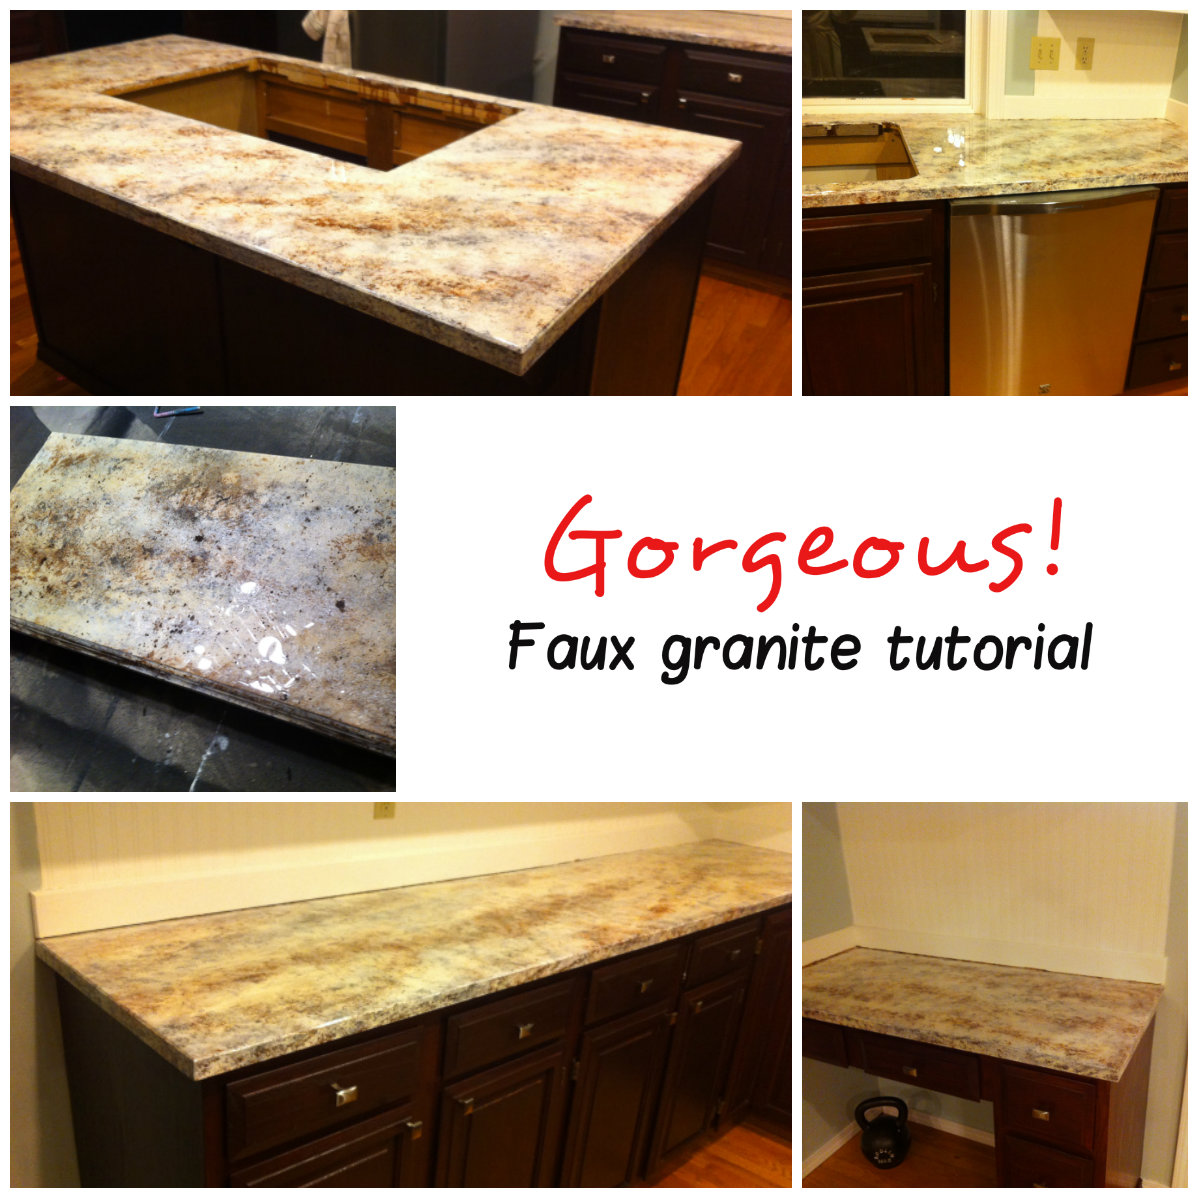
I’ll need to let them finish curing for a few more days before I put the finishing touches on (and the cooktop and sink back in), but for now here’s a sneak peek:


Pretty good, huh? (If I do say so myself). Read on for the tutorial!

I have been in the process of updating my straight from the 80s honey oak kitchen. I started with a beadboard backsplash that is (shh!) actually wallpaper. I got it at Lowe’s and it was very easy to install. That post is here. Then I bought a much needed new refrigerator. Then I stained the lower cabinets and painted the top cabinets white – you can read more about that here. Finally, some new knobs (also from Lowe’s) really brought my cabinets up to date.

Ta-da! So far.
And then there was the countertop. It wasn’t so bad – it was laminate, but at least it was a neutral color. I knew if nothing else, I would paint the trim around it to match the upper cabinets, if that’s all that was in the budget.
But then during a trip to Home Depot, I noticed that they had four colors of real granite that you could get for $35/sf installed. In my area, that is about half the cost of what I’d seen elsewhere. Plus, they were running a special financing deal – 12 months same as cash. What I didn’t think was in the budget suddenly became a possibility. And bonus – I actually liked one of the colors!
That is, until they came out to my house to measure and give me the estimate. See, it turns out this “special buy” would have only worked for 1/3 of my kitchen. And to get the regular buy granite to match the special buy was going to cost extra. So, when it came down to it, the quote wound up being just as expensive as I thought granite would be. And not really in the budget for us. Momentary sadness.
I say momentary because then I remembered some posts I had seen on Pinterest, where crafty women had painted their counters to look like granite, and a few brave souls used this product called Envirotex Lite to top coat their handiwork. In my opinion, this topcoat makes ALL the difference. It’s got a very shiny, glass-like sheen that looks a heck of a lot like polished granite. So I said to myself – what the heck? I had a few spare shelves from some bookcases that I could practice on and see if I liked the results.
My first attempt looked like this.

This is my downstairs bath, which actually has a real piece of granite on top that I got for a steal at a local kitchen/bath supplier. The paper is my painting attempt. I didn’t love it. Back to the drawing board (literally, this time I did it on a board).

I was trying to replicate the lovely piece of Alaska White granite that I got as a sample (to the right of the board).
It was close, but I didn’t LOVE it. In fact, to be honest, there were very few faux granite paint jobs that I saw on Pinterest that I thought were believable. I felt like if I was going to go to all the trouble of using the Envirotex Lite, that I better have something convincing underneath it. Because, while this is a temporary fix, from what I’ve read about the Envirotex, it’s a very durable finish. After all, it’s what restaurants use on bar tops and table tops, and let’s face it, those probably get more use than my kitchen counters. So, if I could get the paint job to be believable, I could turn a temporary fix into a more permanent one.
I became obsessed. I watched and read dozens of tutorials on faux painting. Most faux granite just uses the sponge method with acrylic craft paints. Some looked pretty good, while others looked pretty obviously like sponge painting. One professional faux finisher used an interesting method where he heavily watered down the paint and sort of dribbled it on a flat surface (you can watch it here). He then spritzed it with denatured alcohol. I thought his end result looked pretty good but wasn’t sure I could make that process work on my countertops. I had denatured alcohol left over from another project, so I tried incorporating it into my sponge painting. It didn’t seem to do much to the paint but guess what did? Water. Good old water.
I tried my best to learn the tricks of the pros, but of course with faux painting being their livelihood, most don’t discuss their techniques. One faux painter had samples of her work online. She had this really beautiful faux granite. I studied that sample, and noticed that there was some crackliness to the paint. Hmmm… eureka! She must have used a crackle finish at some point in her process. So I started researching paint crackle techniques and I discovered…. Elmer’s Glue! That’s right, you can use Elmer’s Glue as a crackle medium. Sweet. I have kids so naturally I have that on hand.
So I wound up painting about 10 samples in total, experimenting with different techniques until I found something I loved. And here it is:
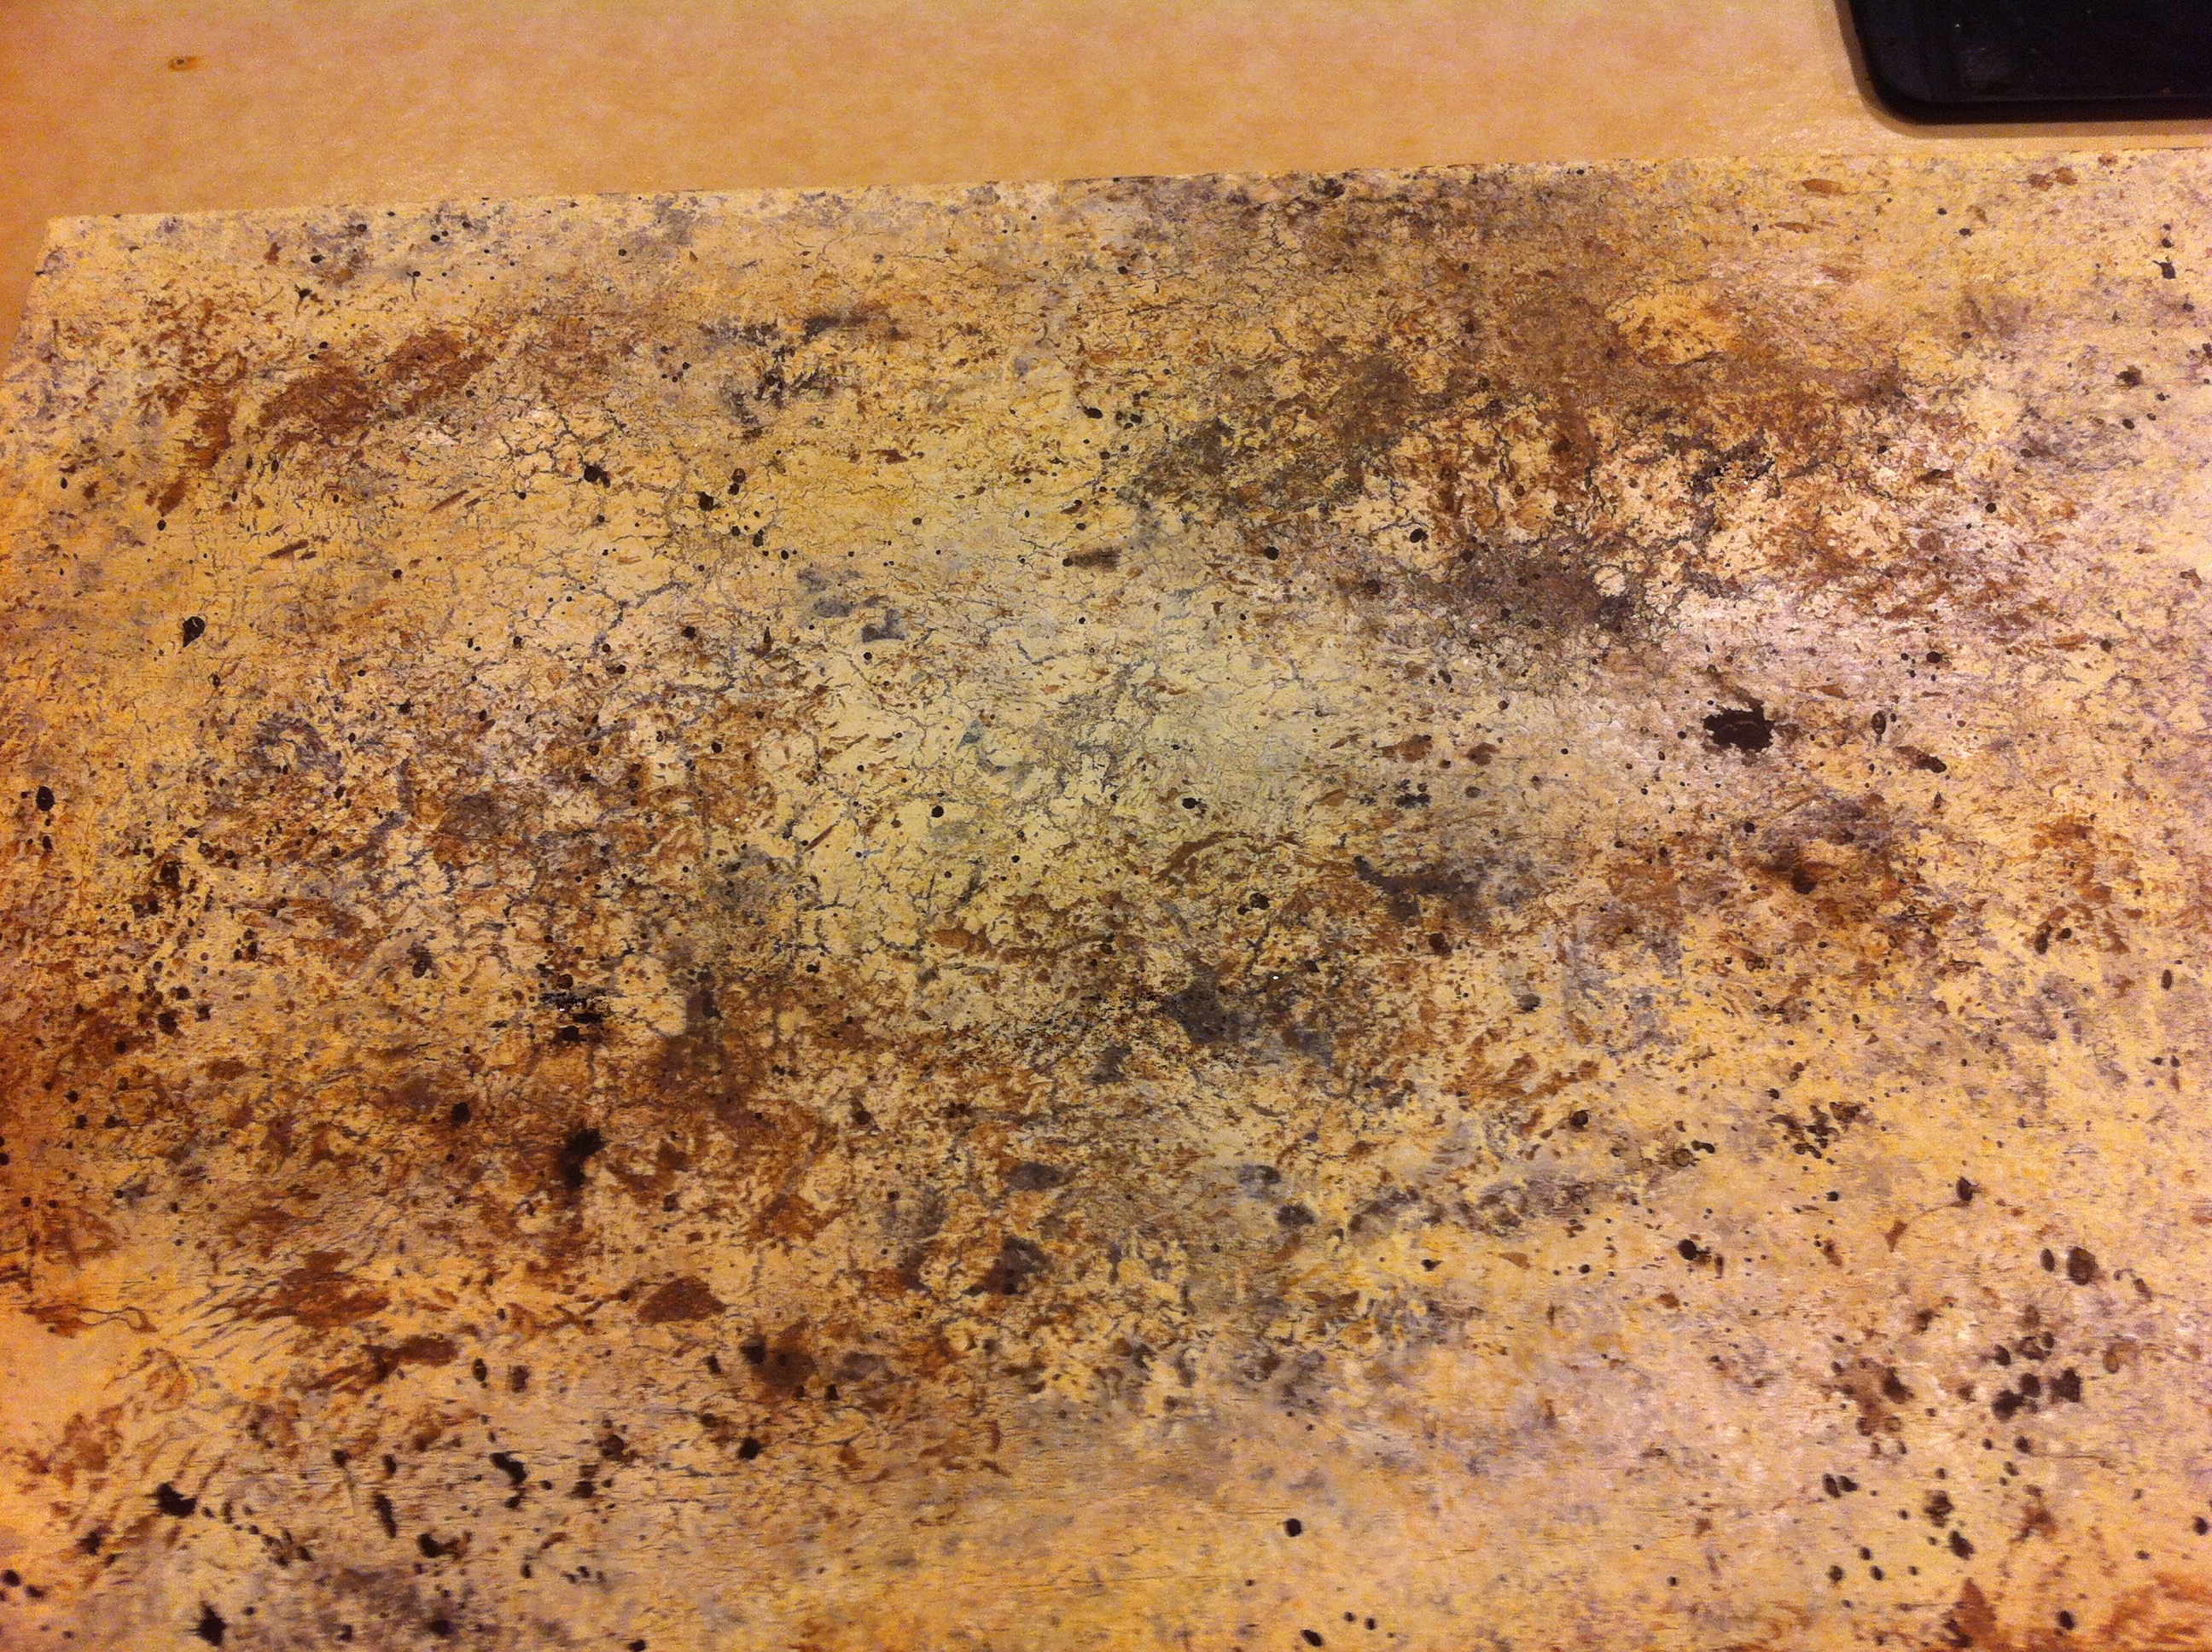
Sample board before Envirotex Lite topcoat.

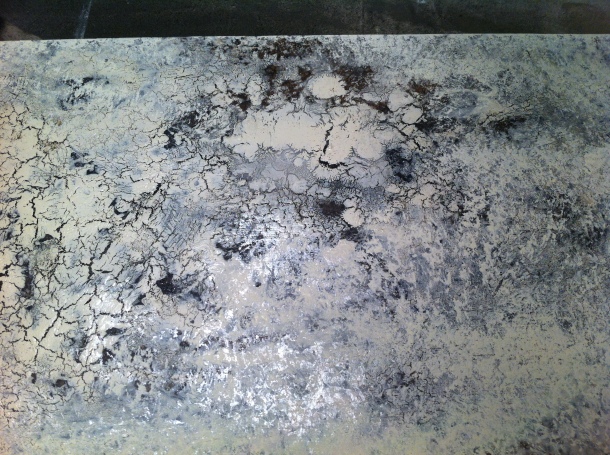
Sample with Envirotex Lite topcoat (and different lighting).
You’ll notice that the finish seems to “soften” with the addition of the Envirotex. This is a good thing to keep in mind when you’re doing your faux painting.
I’m not going to lie and tell you that my process is quick and easy. It’s not. It’s time consuming and takes some practice. It has five layers and uses five different techniques in all and even has some mica flakes thrown in. But guess what? Go look at a real piece of granite, really close, and tell me what you see going on. If you’re honest, you’ll notice that it seems to have infinite layers and colors and shapes. That’s what makes is so beautiful. You’ll also notice that the more expensive the granite is, the more layers and nuances it seems to have. Coincidence? I don’t think so.
But it’s these very qualities that actually make granite kind of a prime candidate for faking. There is no “one” look to granite. Granite comes in a huge variety of colors and patterns. Even the same “type” of granite can look vastly different from slab to slab. So, using this technique will get you something that is bound to look like some kind of real granite out there. I doubt anyone will know upon first glance that it’s not real.
Without further ado, here’s the technique:
- Make sure you thoroughly clean your counters, and lightly sand them, then clean again. Then paint one coat of a quality primer and let it dry thoroughly. Note: I did not faux finish my backsplash. If you want to do this technique on your backsplash, I recommend removing it and laying it on a flat surface.
- Now get out two paper bowls. Put one of your darkest colors into one bowl, and the other darkest color into the other bowl. Water these colors down with about a 1:1 paint to water ratio (it doesn’t have to be exact). Use a large sea sponge to alternately, and randomly, cover your entire surface with these two colors. NOTE (and this is an important note): Give your random patterns some MOVEMENT, where the blobs (mostly) flow in the same general direction. To me, this is an important part of making your faux granite look like real granite. Let this layer dry (it shouldn’t take long).
- Now grab a couple of your metallic accent colors. Put them in two separate paper bowls again, and this time, only water them down slightly. Take a smaller sea sponge and lightly sponge these two colors SPARINGLY, and still make sure to give them the same movement as your first two colors.
- Take your dominant (or lightest color), and sponge this on even more sparingly.
- Let all of the paint dry. At this point you are going to think this is the ugliest thing you’ve ever seen. Don’t despair, this is only the first “layer”.
- Here comes the fun part – Elmer’s Glue! Take a tube of plain old Elmer’s Glue. You are basically going to cover your entire countertop with this stuff. Put it on thicker in some areas and thinner in others. Again, think of MOVEMENT and go in the same general direction as your paint blobs. Once you’ve squired all the glue on your counters, take a small dry paintbrush, and brush in a large wavy pattern that moves in the same general direction as your paint blobs.
- You’ll need to wait about 5 minutes for the glue to start setting up. During this time, take two paper bowls and squirt in your two lightest colors of paint. Now, you are going to HEAVILY water down the paint, about a ratio of 1:3 or 1:4 paint to water. Take two large, soft, and damp sea sponges and SATURATE them with the watered down paint.
- Here’s the other fun part. After the 5 minutes has passed, squeeze the paint out of your sponge to drizzle it on your countertops. Alternate colors, making one more dominant than the other, and move in the same direction that you have for all of the other steps.
- You should have some parts of the counter that didn’t get drizzled with paint. For MOST (but not all) of these parts, take your sponge and VERY lightly sponge your watered down light paint color on them. Leave a few parts bare.
- For the front vertical edge, you can mix up less watered down versions of the paint you just used, and sponge them on.
- You can either be patient and let this concoction air dry, or you can move things along with a heat gun. You’ll want a heat gun anyway for the Envirotex part of this project, and they are only around $20-$30. If you use a heat gun, remember to hold it away at least 6 inches. The longer you hold the heat gun over one spot, the more your paint will crackle. Use this knowledge to make your crackle patterns random.
- At this point, your counters will look something like this:
- When I first did this technique, I almost stopped at this point because I thought it looked cool. But I kept going because it didn’t look enough like granite.
- Let this dry completely.
- Now we’re going to cover up some of our crackles. Take your lightest (or second lightest) paint color, very slightly water it down, and sponge over some of your crackles. While your paint is still wet, add a few mica flakes here and there to the wet paint. Let that dry completely.
- Now take your mid-range color, and water it down slightly. This time, you are going to use the plastic bag method. Take a plastic grocery bag and wad it up in your hand. Dip it in the paint, and blot most of it off on a piece of paper or cardboard. Then slightly blot this over your darker, crackled areas. Also lightly blot it on your lighter sections. Make sure you change the direction or your blotting to make it look more natural.
- Now take your spray bottle filled with water, and spray down your fresh paint. The closer you spray, the more movement the water will give the paint.
- Let this dry thoroughly.
- Repeat steps 16-18 with your mid-range metallic color. Let dry.
- Now take your second darkest color and water it down heavily, a 1:4 ratio should work. You can put on a glove for this part, but you don’t have to. This is just acrylic and water and will wash off just fine. Put your fingers in a claw position and dip your fingers into the paint. Shake off the excess into your bowl, and then flick the paint onto your countertops.
- Whew! Almost there. After everything dries, go and mix up a combo of your two lightest colors, and don’t dilute with water. You are now going into “editor” mode. Take your small sponge and very lightly dab your paint onto any areas that you feel are “too much” – i.e. big paint blobs that you don’t like, areas that you got too “heavy” with your mid-range colors, etc. Keep “editing” until you are happy with the results, but make sure you don’t cover up all of your handiwork. And remember, the epoxy coating will soften up your finish.
- Let everything dry, and then lightly sand your surface, and wipe it down. Rub your hand over it, and if you feel any bumpy patches, sand again.
- Now we’re ready for the Envirotex, which I’ll cover in another post.

I’ll post pictures of the final kitchen reveal when I get it all put together. I’ll also come back and edit this post with pictures of the actual colors I used, and pictures of the different tools I used.
Enjoy, and happy faux painting!

Awesome. What exact colors did you use please? I love it
Hi Steph – thank you! For the first layer, I used Black and Brown from the craft smart paint line, and also Vanilla Bean from Martha Stewart. Then I used Brushed Pewter from Martha Stewart crafts and Gold from craft smart. Then I used Vanilla from craft smart and a little of the Mother of Pearl from Martha Stewart. For the layer that gets squeezed on after the glue, I mostly used the Vanilla, sometimes with Mother of Pearl mixed in. The darker color to squeeze on is Martha Stewart Champagne mixed with Vanilla. The mica flakes are Stampendous Pearlized Mica fragments. I then used the Brown and the Brushed Pewter for the plastic bag method. Finally, I used the Vanilla Bean as the color I flicked on with my fingers. I got everything except the Mica flakes from Michaels. I got the Mica flakes from Amazon. Hope that helps!
Love your sample! Did you do your counters yet?
Hi Patty – yes! I just finished them yesterday. I’ll post some pictures tonight, then I’ll take more after the epoxy is finished curing and I can caulk the countertop/backsplash edges – it will probably be this weekend.
They look really good – they aren’t perfect but I (and my husband) are probably the only people who will ever notice. The epoxy step was pretty stressful and tricky with the air bubbles. I’ll post a full update in about a week. Thanks!
The counters look great! Did you change anything from your test run? Like paint colors ect. Also how much glue did you use, 1 bottle, many bottles?
Thanks,
Patty
Hi Patty! I used all the same colors from my test run. The only thing I updated from the original directions was that when I completed all the steps, I went back in with my lightest color and “edited” my paint job – I toned down a little some of where I put in the darker colors of paint (I added it to the tutorial). Good question about the glue – I actually had my husband run to the dollar store to get more glue because I was running out. I think I wound up using 6 bottles of glue in total – my kitchen has 72 square feet of countertop – so that would be like 1 bottle of glue per 12 square feet.
Hi Amanda, Thank you for your quick reply. I need to make a run to the dollar store. Thanks for mentioning that! Hopefully I can try this tomorrow.
Awesome Patty! If you decide to do the Envirotex right away – a couple of things. Make sure you follow the directions on mixing it to a T. And also, they say to go over the air bubbles with a blow torch or heat gun 5 minutes after you pour it. That is true – but what they fail to mention is that bubbles will continue to surface for a few hours after you pour it. I would plan to hang around your house for several hours after you pour the Envirotex, and check on it every 15 minutes or so. We checked on it for an hour and a half after we poured it on, and were vigilant about using a heat gun on our bubbles. But then we left the house for a few hours, and when we came back we had several bubbles that were not there before.
Amanda thanks for the tips. I was able to find some epifanes (mainly used for boats). So I think I am going to try that as the top coat.
Hi, I love this! What color primer did you use? (I ask because the Gianni kits I looked at use black primer but I’m feeling like yours was light…Kilz?).
Hi Anne! I just used the Kilz Advanced primer in white – I didn’t tint it or anything. Thanks!
thanks 🙂
Pingback: Drumroll please… Kitchen reveal! | scharlerama
Wow !! I have been searching for a more professional look than the normal sponge method and here it is. My kit is the Gianni but am adding a few extra shades to better match my mosaic backsplash. Now,(not sure of the glue step) did you pour the glue all over or sponge it on before you used your brush for the wavy pattern ? Thanks for all your research and determination, Daren.
Hi Daren!
I just squirted the glue directly on the countertop, and then used the brush to make the wavy pattern. I squirted the glue in kind of a zig-zag pattern, going heavier in some spots and lighter in others. Hope that helps!
I love your post! I’ve been researching alot to paint my own counters. I was curious is you used a base color and if so which color did you use? Or was the white primer your base? Thanks!
Hi Amanda!
I just used the white primer as my base. The first layer of sponge paint (the dark colors) should cover about 99% of the primer when you’re done. Thanks!
Pingback: Painting kitchen cabinets | scharlerama
WOW, just WOW. I have been searching for the perfect blog on counter painting to learn from and i have soooooo found it. EEEEEK!!! GOSH, THANK YOU SO MUCH FOR PUTTING THE TIME AND EFFORT INTO WRITING THIS BLOG. I know how time consuming it can be and just have to say I appreciate it 100%. I just recently started my own faux painting business so if I’m ever asked where I learned I will definitely give you CREDIT!
Thank you!!!!!
Liz Baker
WOW! Thanks for taking the time to explain your steps. You did an awesome job! I’ve been studying videos on the internet endlessly and your is the best. Can you please tell me why the colors are watered down?
Thanks Candy! If you’re meaning how the colors are watered down after the epoxy step, it’s because the epoxy is so thick. It’s like the difference between the way a person’s eyes look when they’re wearing glasses vs. not. It’s more pronounced in photos. In person, the finish doesn’t look quite so watered down. Hope that helps!
Thanks for responding. I’m sorry. I should of better stated my question. I’m referring to step #2(paint to water ratio), the beginning paint process.
Thanks for responding. I’m sorry. I should of better stated my question. I’m referring to step #2(paint to water ratio), the beginning paint process.
Oh of course! The watering down of the paint does a few things. Most importantly, it helps the colors blend and bleed together, giving a more natural look. It also helps the process go faster, and makes your paint go a lot farther. And makes clean up easier. Hope that helps!
That makes sense. esp. the point about the colors blending easier. Now! I’m ready to tackle my counter top. Thanks again!
What colors did you use? I just love your post!!
Hi Amy! My reply to Steph’s comment above has the names of the colors I used. Thanks!
Lovely and really awesome job.
I just love what you’ve done! I am absolutely obsessed with finding a realistic faux granite technique and am so glad I stumbled upon your blog! I’m a bit terrified of your process though as I am so afraid I won’t end up with anything close to what you’ve done. 🙂 It’s stunning! I think I’ll start with foam board like you have and see whether I can replicate what you’ve done. Kudos to you and thank you so much for sharing!
im sorry if you already answered this question and I missed it…did you use clear glue or white? And is Elmers a must or will generic school glue be fine?
Hi Kim-
I used white school glue, but I got mine at the dollar store, so it definitely wasn’t Elmers. Thanks!